The General settings page allows you to decide how the plugin will affect your website. You have three alternatives:
- Using automode: this way, the plugin will automatically apply the selected effect to the specified list of elements (more on this later on)
- Using shortcodes: you can create a pratically infinite number of shortcodes, each with a specific effect* and use theme verywhere WordPress allows the use of a shortcode
- Using both automode and shortcodes
*Important: currently you can use as many different effects in the shortcodes but kee in mind that all other settings like colors, width, height, border radius etc. will be remain the same.
Automode
First you have to activate automode using the dedicated switcher:

Once the Automode is activated you can decide on which elements the desired effect will be applied automatically:
- Everything: this means that the effect will be applied to every link, button, input of type ‘submit’ and in general to each element with class ‘button’ or ‘btn’; you probably won’t choose this because it will heavely affect the look of your website since it will change the navigation links;
- Everything except menus: all the elements which are part of a menu (primary navigation, footer menu, sidebar menu etc.) won’t be affected by the menu; this is the option checked by default;
- Only buttons: The effect will be applied to all buttons, input of type ‘submit’ and all those elements which have class ‘button’ or ‘btn’;
- Only buttons except in menus: as the previous options but excluding all elements which are part of a menu;
- Only to: if you check this option, a text box will appear where you can type a class name: the effect will be applied to all elements which have that class; of course, it can be a custom class that you manually add to specific elements while you’re building your pages or posts;
Excluding specific classes
- you can exclude from the plugin action any class defined by any theme or plugin and even by WordPress itself: TEF Buttons will just ignore the element whith that class or that are children of an element with that class
- obviously you can exclude custom classes too
- or finally you can just add to any element you want to exclude from the REF Buttons action the class norefbutton
Important: Due to the virtually infinite ways themes’ authors design their markup, the options above might behave in an unexpected way. Without going into the technical details of the code implemented in the plugin, you may have to try different options to find the one that best suits your needs. Use the excluding classes options alongside the default options above to get a the best result.
Shortcodes
Red Eyes Froggy Buttons Premium supports shortcodes. This is a great advantage to shine your pages differentiating between different buttons and links, using different effects for them. You can use as many shortcodes you want and each of them with its own specific and unique effect. As said above, though every shortcode will have a different effect, the other settings, like colors, borders, shadows etc. will remain the same.
How to create a shortcode.
That’s just a joke! just go to the Effect settings page, select the effect you like, set all various options and then click the button ‘Create shortcode’ which is below the Preview panel of the page:
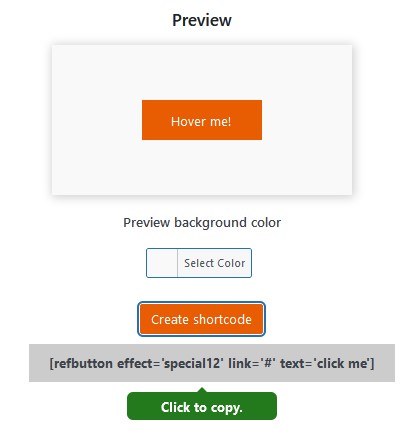
After that you can just use the shortcode where you want. As you can see, it’s up to you customize the link and the text of your button directly in the shortcode.